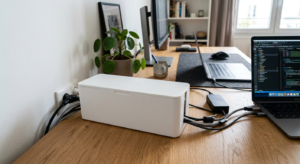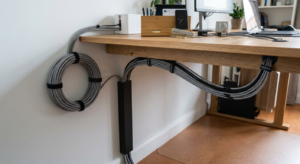
Cables running loose along a wall or baseboard are one of the most visible signs of a messy home office, and a cable raceway fixes it by covering the run in a single paintable channel. By the end of this guide, you’ll have a raceway installed that hides your cables cleanly instead of leaving them taped or draped along the wall.
What You’ll Need
- A cable raceway kit sized to your run — a full kit like the D-Line 157in Cord Cover Kit covers most single-wall runs with corners and joints included
- A simpler option like the Delamu 157in Cord Hider if you don’t need extra accessory pieces
- A tape measure
- Isopropyl alcohol and a cloth to clean the wall surface before sticking anything down
- Scissors or a utility knife to cut channel to length
Step-by-Step Instructions
Step 1: Measure the full run before buying or cutting
Trace the path your cable actually needs to take — from the outlet to the device — including any corners, and measure the total length. This determines how much raceway you need and where you’ll need corner pieces versus straight channel.
Step 2: Clean the wall or baseboard surface
Wipe down the mounting surface with isopropyl alcohol and let it dry completely. Adhesive backing bonds far better to a clean, dust-free surface than to a wall as-is, and skipping this step is the most common reason raceways peel off early.
Step 3: Cut the channel to length
Use scissors or a utility knife to cut straight channel pieces to the measured lengths from step 1, leaving pieces for corners and joints uncut until you’ve confirmed the layout fits.
Step 4: Peel and stick the channel base along the route
Remove the adhesive backing in short sections as you go, pressing firmly along the wall to ensure full contact — rushing this step leads to weak spots that lift over time.
Step 5: Lay the cables into the open channel
Place your cables into the mounted channel base before snapping the cover in place, keeping them roughly straight rather than bunched to make future additions easier.
Step 6: Snap the cover closed over the cables
Press the raceway’s cover strip down along its full length until it clicks or seats fully, hiding the cables inside the finished channel.
Step 7: Paint if desired
Most raceway channel is paintable — if you want it to disappear into your wall color rather than stay visibly white, apply a coat of paint matched to the wall once the install is fully seated.
Tips for Best Results
- Cut corner pieces last, after confirming your straight runs fit — corners are the hardest part to redo
- Don’t overload one channel with more cables than it’s rated to hold; use a second run if needed
- Let the adhesive set for a few hours before adding any weight or tension to the channel
- If painting, use a light coat and avoid painting into the seam where the cover snaps on, or it may stick shut permanently
Common Problems and Fixes
Raceway Won't Stay Stuck to the Wall
Likely cause: The most common cause by far is skipping surface prep — dust, oils, or a textured wall surface all prevent the adhesive from bonding properly.
Fix: Remove the raceway, clean the wall thoroughly with isopropyl alcohol, let it dry completely, and reapply with firm, sustained pressure along the full length. For textured or unusually cold/humid walls, add extra double-sided tape at corners and ends specifically.
Cover Won't Snap Closed Over the Cables
Likely cause: Too many cables packed into a channel sized for fewer, or cables bunched instead of laid flat side by side.
Fix: Remove some cables and route them through a second, separate raceway run, or redistribute the cables so they lie flatter rather than stacked, giving the cover room to seat properly.
Raceway Looks Bulky or Uneven
Likely cause: Cables bunched unevenly inside the channel, or a channel width that’s oversized for how few cables it’s actually holding.
Fix: Redistribute cables evenly along the channel’s width before closing the cover, or switch to a narrower channel size if you’re only routing one or two thin cords.
Paint Is Chipping or Peeling Off the Raceway
Likely cause: Paint applied without a proper primer coat, or paint applied to plastic that wasn’t cleaned or lightly roughened first for better adhesion.
Fix: Sand the area lightly, wipe clean, apply a plastic-adhesion primer, and repaint in thin, even coats rather than one thick layer.
Corner Pieces Don't Line Up with Straight Sections
Likely cause: Straight channel cut slightly too long or short before the corner piece was test-fitted.
Fix: Dry-fit all pieces — corners and straight sections — before committing any adhesive, adjusting cut lengths until everything lines up, then apply adhesive only once the full layout is confirmed.
Raceway Cracks or Becomes Brittle Over Time
Likely cause: Prolonged sun exposure or extreme temperature swings, especially on raceways installed near a window, can dry out and stiffen some plastic channel over years of use.
Fix: Check whether the affected section runs near direct sunlight or a heat source, and if so, consider relocating the run slightly or switching to a UV-resistant channel material for that specific section when you replace it.
Frequently Asked Questions
Do I need to clean the wall before installing a cable raceway?
Yes — wipe the surface with isopropyl alcohol and let it dry fully before sticking the raceway down. Skipping this is the most common reason adhesive fails early.
Can I paint a cable raceway after installing it?
Most raceway channel is paintable, and painting it to match your wall color is a common way to make it disappear visually rather than stay visibly white.
How do I handle corners with a cable raceway?
Most kits include dedicated corner pieces — measure and confirm your straight sections fit first, then cut and fit corner pieces last since they’re the hardest part to redo.
Why does my cable raceway keep falling off the wall?
This is usually an adhesion issue — the wall wasn’t cleaned before install, or the surface is too textured or cold for the adhesive to bond properly. Re-cleaning the surface and adding extra tape at stress points usually solves it.
Can I re-stick a raceway that's already fallen off once?
Yes, but clean both the wall and the raceway’s adhesive backing (or add fresh double-sided tape) before reapplying — reusing a dirty or worn adhesive strip rarely holds as well the second time.
Why won't the raceway cover snap shut?
Usually too many cables are packed into the channel, or they’re bunched instead of lying flat — redistribute the cables or split them across two runs.
Is it normal for raceway paint to chip?
Paint applied directly to plastic without a primer coat chips more easily — sanding lightly and using a plastic-adhesion primer before painting gives a much more durable finish.
Can sunlight damage a cable raceway over time?
Yes — prolonged UV exposure and heat can dry out and stiffen some plastic channel materials over years, particularly on runs near a window. A UV-resistant channel material holds up better in that specific spot.
Conclusion
A cable raceway install is a short, one-afternoon project, but the wall-cleaning step is what actually determines whether it stays up long-term. Ready to upgrade? Check our Best Cable Raceways guide for a full comparison of top picks.